
^ CLICK FOR HOME PAGE ^
----------------------------------------
o

April 06, Yamaha FZR250 with Suzuki T350 Engine.
TFZ315-R
This Bike For Sale or would consider trade/swap. What have you?
How did I choose this name for my project?
The rolling is a FZR, the engine is from a Suzuki T315-R model.
So T-FZ-315-R
I bought the FZR at a local swap, it was mostly disassembled, the FZR motor was there too but out of the frame. I actually only wanted the bike for the front wheel. At the time I had a SRX250 with a bent wheel but as it turns out the wheels on a srx and fzr are different sizes. So parting it out seemed like a good idea. The motor was sold quickly so now I am left with a whole lot of bits that probably arne't too popular. As it happened I had a Suzuki T350 motor sitting on the floor beside the fzr so with a bit of jiggle here and a bit of shove there I am now thinking this could work.
Above pics left top right.
A glimpse into the future, it will look somewhat different but you get the idea.
A bit tight for the carbs to squeeze in there, will need to cut some tank out or perhaps use a tank from a RZ350 or similar. Time will tell.
Engine will need to be mounted higher to allow clutch cover clearence although the frame piece that side is bolt on so possible to remove it access the cover.
Above pics left to right
Should be no problem mounting the chambers I have, at least no space problems.
Thats the tank you see behind the motor, If I don't use it i may even be able to mount a stock air box in there.
Rear engine mount, some thinking and work to be done there.
The sprocket cover will need cutting down to clear the frame.
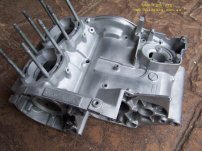
The engine has been fully stripped and blasted.
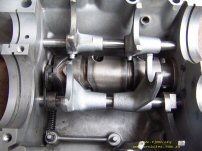
The correct positioning of drum and forks. Note the heat marks, been hot in a previous life, I will look after it much better.
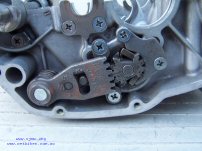
Correct Posiioning of shift shaft to the drum mechanism.
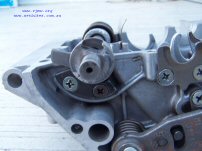
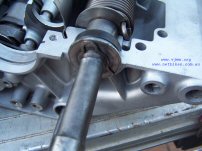
The above pictures will be used in a article I will doing on pre loading the kicker.More on that as the motor goes together.
UPDATED JULY 14 06
I have now basically completed the engine rebuild, it has new rods, all bearings and seals, pistons and rings.The alternator is not fitted as this will go away to have the output increased, the FZR lights are twin Hagalon and the Suzuki stock alternator barly handles stock lighting. I also need to get a few stainless allen type case screws. The collet holding clamp screws are broken off in there threads so I will need to attend to that as well, but its just stuff as you go. This bike will have chambers so I may be doing some other machining to the barrels??. Anyway have a look at the pics now, note the long term water damage to the heads, such as life.
Page Updated August 25: Engine and pipes fitted.
Bike is now ready for finishing, by that I mean, make electrials work, install oil line, fire it up and tune, fit new rear sprocket and chain, test ride.
Then strip in back to bare to do the pretty work.
I need to remove a few more unnecessary frame lugs, make new engine mount bolts and spacers and about a thousand other tasks along the way. In short there is still al lot of work to be done but I am liking what I see so far.
The side stand was moved forward as before it got in the way of the exhaust chamber.
Note the opening in the side of the tank cover. This is for a rubber airscoop that slots into the lower fairing. I'll be fitting that up but the lower fairing will be cut down. Hard to explain, you will have to wait and see.
The FZR front fairing bracket was modified to fit up a bracket from T350. The instruments are from different bikes but they are circa 1969. The tacho cable works as normal but I may have to modify a Suzuki speedo cable to fit the Yamaha wheel speedo drive if a Yamaha cable doesn't fit the speedo thread.
I haven't thought too much about colour yet, but at this time I am leaning towards traditional GSXR blue white graphics style. This could change second by second:-)
STAGE 2. Rideable. 29 Sep 06
I have now ridden this around the block a few times and there are a number of small things to attend to yet but its all good so far. Handles very well, especially considering there must be just about no oil left in the forks due to leaking seals, this is the next job. All the electrics are working, brakes are ok except a horrible noise from the front disc which I found was the pads put in backwads, I'm bad:-) Have fitted a couple of Suzuki T indicators to the rear and a T mirror to right front, it is only temp but I kinda like the look anyway. Have recoverd the seats in groovy blue like early GSXR and given the tank a quick 10min rattle painting just so the cops leave me alone. Found some better side panels that don't need any work other than painting. I still need to fit up the under top fairing sections. I'll probably make a start on that within a week. The header collets tend to rattle out pretty quick so I will have to sort that out pretty soon. I had to have a rear sprocket made for this one, cost $125.00 but I had to have it. Ok thats it for now. Below are a few more updated pics.
The Head Steady
This was required due to excessive vibration under revs. My friend that did the work is sort of a unqualified engineer. He is currently building a 40 foot steel hull yacht, now 3/4 finished that he will sail around the world when complete. I rear thinker. I am sure Nasa could use this guy.
Anyway back to the bike. The frame down tubes are basically too wide apart for the motor. In hindsight we could have modified the frame to better suit the engine size at the time we first fitted the engine but I decided to take the punt that the frame as is would work. Well it didn't so the head steady was invented. The top plate is mounted at 4 points to the frame and to each head bolt. Each bolt was drilles and thread tapped to 6mm. The alloy spacers you can see in the right side pic below were centre drilled to 6mm on the top side and 16mm drilled on the bottom side to encase the head bolt. The whole setup is a simple idea but many hours of work went into it. It works beautifully. I took the bike on a 150 mile ride recently and no vibrations at any speed at any area of the bike. The bike will soon be pulled apart for painting etc.
Oil level gauge, the bloodline.
Original FZR choke lever used.
Gleaming clutch cover
Many hours spent on these wheels
Air vent to cool the ...er... oil tank:-)
Headers, a small lick of paint now needed.
Day and night view of the instruments, Will try and sort a brighter light for the tacho.
left view
Linished the wording off the mastercylinder cap and polished it
Blue tinted points cover. I can feel some led lights coming on:-)
Rear view, still need to fill a few small holes there
More wheel work
Trendy new day indicators
Another rear view
left the factory FZR stickers on the chain guard.
Right view
Blue on man:-)
Will fit a blue stripe thru the centre of the tank soon
light me up baby:-)
Overall I am very happy with the finish, a few minor things to do and i can go on with the next project.
A very big thankyou to friend and fellow vjmc member Scott Abbett. Scott completely rewired the bike with all new wiring and plugs. Not a quick job by any standards.
Also Peter Fagerstrom for frame mods. Peter is a long time friend from school days.
Restore hard
Chris Dupen. VJMC AU member A652
Brisbane 4122 QLD AU Ph. 0422819200 netbikes@netbikes.com.au |